Be the first to try Android P on your Pixel


Last night, Android P was officially released. For now though, only a select few smartphones can use the developer preview of Google's latest operating system. If you're one of the lucky ones, you'll find a tutorial below explaining how to download and install it on your Pixel device.
Android P is here!
Google announced the first developer preview, but this year only four smartphone models can benefit from this update, and this doesn't include Nexus smartphones. Good news if you have a Google Pixel, Pixel XL, Pixel 2 or Pixel 2 XL, though, you have the opportunity to test out these new features. Other Android devices will receive this update when the final version is made available.
Install Android P on your Google Pixel
Reset before installing
My advice would be to reset your device first, and although this isn't a necessity, many users complain about bugs when installing a new version (in addition to the Developer Preview bugs).
To avoid these bugs, a complete system reset is highly recommended.
Step one: unlock the bootloader
As mentioned, Android P is currently only available for Pixel smartphones. In the same package, you will find the latest security patch.
To flash your device, your bootloader must be unlocked and the USB debugging mode must be enabled in the developer options.
To unlock your bootloader, it's quite simple.
- First, activate the developer options. First, you must go to the settings on your phone.
- Tap Settings > System > About the phone. You will see something in the menu called "build number".
- Tap on it seven times and ta-da! You are now a developer (options for which will now be in the Settings menu).
You can find more information about the developer options in our article here.
- Now, go to Settings > Developer Options > Enable OEM Unlocking. Depending on which device you have, you may be asked for your security code (the one you use to unlock your screen). A warning message will appear, you will need to accept this and then the first step is finished.
Step two: where to download the installation image (Factory image)
What is an installation image?
The restoration image (or factory image) can be used for a variety of reasons, for example as soon as you notice bugs or if you want to reset your device. The aim is simple: to reset the software fast. This process is very useful for installing Android P on compatible devices.
Where can I download the factory image?
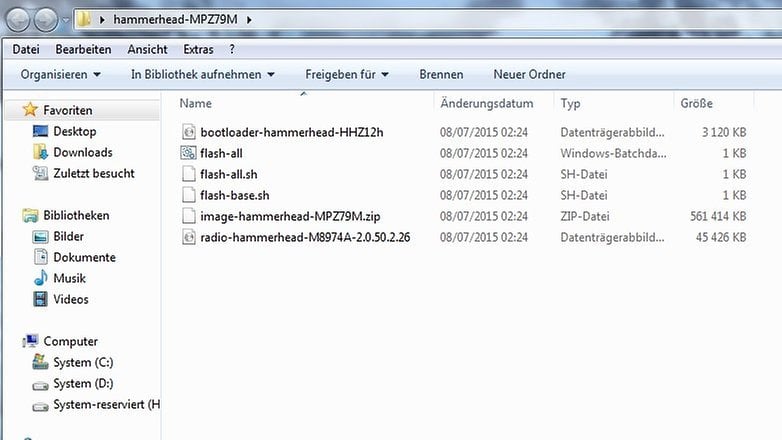
Step three: unzip the file
All the necessary files you will need are in the compressed zip files above. You must unzip all of these files.
Step four: install the factory image
Before you begin, you must be aware of what you are getting into. If something is done incorrectly, it can cause some damage to the system. You could end up with a faulty smartphone (and no, it's not our fault!).
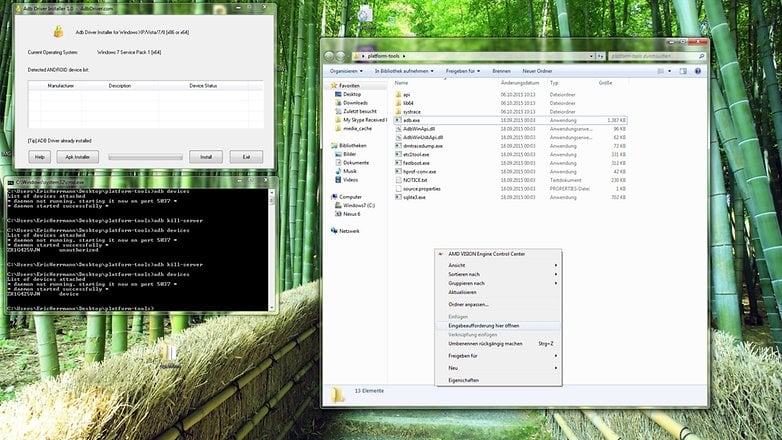
- Install Android ADB and Fastboot drivers on Windows
- Install Android ADB and Fastboot drivers on Linux and Mac
If all these steps are followed carefully, it is an easy process:
- Download the Android SDK available here: http://developer.android.com/sdk
- Add the SDK tools and platform tools folders to the PATH environment variable.
- On Mac: Open the command prompt and type "export PATH=$PATH: <Android SDK path>".
- On Windows: Right click on "My Computer" > Properties. Go to the "Advanced" tab and click on "Environment Variables". Modify the variable "PATH" and add the path to the Android SDK. - For Windows, you need Google USB drivers. These are found from the SDK Manager available at the root of the SDK folder.
- To find them, go to Extras / Google USB Driver in the Manager. Then connect the mobile phone to the computer, then right-click "Computer" > Manage.
- In the left panel of the window that has just opened, right-click on your device that must appear in "Other devices" > Update drivers.
- Then, choose the manual installation, the drivers are located at <SDK path>/extras/google/usb_driver.
- To verify that everything is working, type "adb devices" on a device (or command prompt on Windows). If your device reference appears after "List of devices attached", it's all good.
Installation procedure
Note: Before you start, it is important to know what you are doing! The installation is done at your own risk and, again, can potentially damage your device. Before proceeding with the installation, it is recommended that you save your personal data somewhere else, as it will be deleted. Note that once the Android P version is installed, a restoration system will automatically be set up. Anyway, this tutorial is for people in need or those who don't want to wait for the update.
Here is the procedure:
- Open your computer / command prompt (mac/windows)
- Go to the directory where the file is unzipped
- Example:"cd <Folder path>" (example: cd c: /users/android-l-files-installation)
- Once that's done, restart in "bootloader" mode.
– Or via the command "adb reboot bootloader"
– Or by starting your device:
* Pixel: volume buttons + power
* Pixel 2: lower volume button + power - After that, unlock the Pixel bootloader by typing "fastboot oem unlock".
- From there, start the flash using the file "flash-all.bat" (Windows) or "./flash-all.sh" (Mac)
- After installation, your Android device should reboot on its own.
If you wish, you can also relock the bootloader. To do this, you will first have to restart your terminal in "bootloader" mode (see step 3), then type the "fastboot oem lock" command. From there, the bootloader of your terminal will be directly relocked after a restart.
For more details, check out the official Google developers site.
Installation problems and solutions
Error: "fastboot command not found","Fastboot command doesn't exist".
You are probably trying to perform fastboot operations outside of the folder where fastboot is unzipped and the files in the restore image are unzipped. Make sure you're in the right folder.
Error: "update package missing system.img"
In this case, you need to flash the elements of the restoration image one by one. Restart in fastboot mode, go to the directory where you initially uncompressed the files (the same as when unlocking the bootloader) and open a command prompt (right click + shift in an empty area of the folder). From there, enter the commands below by pressing enter each time.
- fastboot flash bootloader <NAME OF BOOTLOADER>.img
- fastboot flash radio <NAME OF FILE RADIO>.img
(depending on the version, this file may or may not be there) - fastboot reboot bootloader
- fastboot flash recovery recovery.img
- fastboot flash boot boot.img
- fastboot flash system system.img
- fastboot flash cache cache.img
- fastboot flash userdata userdata.img
Finally, restart your Pixel, and everything should have worked.
Can't run the "flash-all.bat" file
Make sure that you clicked on flash-all.bat in administrator mode (right click, "Run as administrator")
Have you installed Android P on your Pixel? Let us know what you think in the comments!