HomePod (mini) setup: How Siri comes to life on Apple's smart speakers
 setup: How Siri comes to life on Apple's smart speakers")

Three years after the first HomePod was released, Apple rolled up their sleeves to introduce the smaller and more affordable HomePod mini. Both of these devices are smart speakers that will work with Apple's voice assistant, Siri. In our guide, we are here to help you set up the HomePod and HomePod mini should you have any difficulty in doing so. In addition, we will also throw in some tips on integrating them into your smart home.
Priced at just under €100 ($99 in the US), this diminutive Siri speaker is a useful addition to your smart home. While the HomePod that was introduced in 2017 is close to three times the price of the HomePod Mini, and will most likely find a place in the living room, owners of an iPhone, iPad, or iPod touch will certainly find room for the smaller speaker in other places such as the kitchen, bathroom, and the like. Assuming your humble pad comes with the bare necessities of a kitchen and a bathroom, but you do not own an iPhone, iPad, or iPod touch, we apologise as this guide would not be of any use to you. The reason behind it is simple: you would need one of those iOS-powered devices to be able to set up the HomePod mini as well as the HomePod.
Setting up the HomePod and HomePod mini
When it comes to the setup process, the two HomePod models are very similar. After unboxing and connecting them to a power outlet, you'll hear an audible beep after a few seconds and a pulsing white light will appear at the top of the speaker.
This is where you reach for your own iOS device to continue with the setup. After unlocking your iPhone, iPad, or iPod touch, place your device near the HomePod or HomePod mini. At this point in time, the speaker should be detected automatically and the configuration wizard will launch.
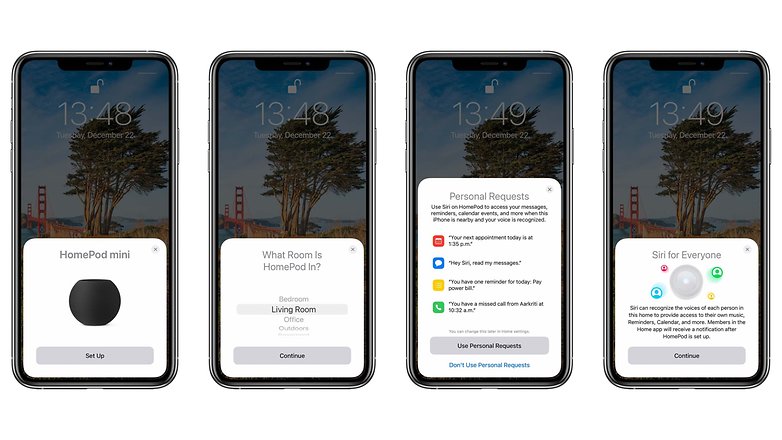
Tapping on "Configure", the wizard continues by asking a series of questions about the location and features that you want to use. The HomePod will rely on the smart home configuration that was saved in the Home app in order to select its locations. You can use the app to further customise the speaker again once it's set up.
Also part of the initial configuration is what is known as "Personal Requests." These allow the HomePod to access messages, contacts, calendars, notes, and other apps on your iOS device. If you activate this option, Siri can read out incoming messages via the speaker. The HomePod also supports voice recognition and can thus be used by several different users instead of limiting it exclusively to just one. Because of the private information that can be revealed by enabling "Personal Inquiries" with others who live under the same roof, you should only enable this option if you trust everyone in the same household.
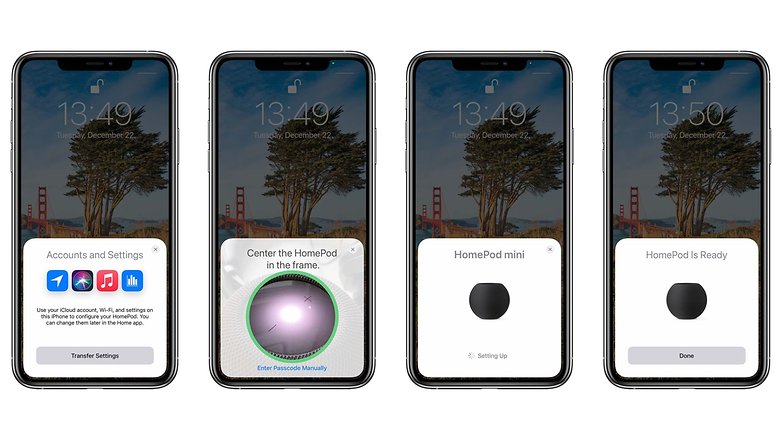
The final HomePod setup involves taking a snapshot of a code on the HomePod. Alternatively, you can enter this code manually. After that, the speaker will walk you through a few more examples to demonstrate Siri's capabilities on this device. The setup is now complete and you can make full use of the HomePod.
After setup: Configuration via the Home app
As mentioned above, the HomePod can be configured via Apple's Home app. The Siri speaker is part of the Smart Home ecosystem and is configured accordingly. With a long press on the HomePod, the speaker displays the media that is currently playing. At this point, you can also view set alarms or set up new alarms.
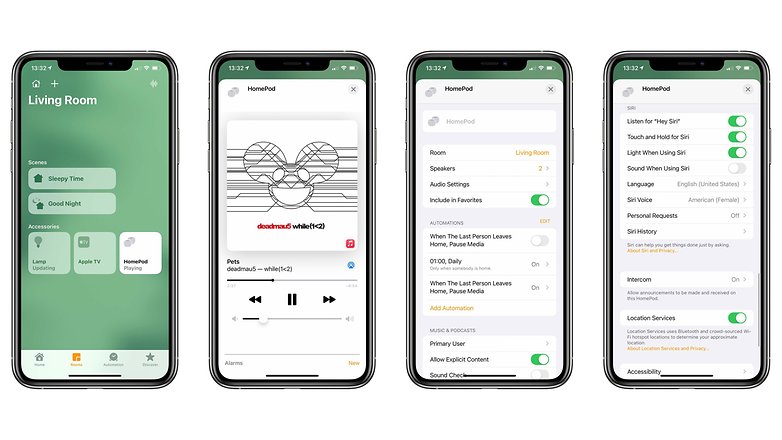
Swiping this overview upwards brings you to the actual HomePod settings. Here, you are then able to specify where the speaker is located in your own house or apartment. You will also be able to set up other automated fucntions so that playback will stop automatically when you leave your home, for instance.
Another interesting option offered by the HomePod and HomePod mini is the activation of so-called stereo pairing. This allows you to combine two HomePods so that songs can be played in stereo mode. However, you must always connect two of the same models, which means the HomePod with another HomePod, and a HomePod mini with another HomePod mini. It would be impossible to pair a HomePod with a HomePod mini. This allows for a more powerful sound, especially when you use the regular HomePod in larger rooms, as it supports true stereo playback.
For those who do not want to activate Siri on the HomePod via voice command, this setting can also be found in the Home app. However, the voice assistant can still be activated in this case by touching the HomePod's surface for a longer time. This can also be deactivated if desired.
HomePod: Access control and updates
Also in the Home app, you can specify who has the right to use the HomePod as a speaker. In order to do this, tap on the small box in the top left corner of the app and select "Home settings". In addition to software updates, one can also narrow down the scope of user access here. There are three options to choose from: "Everyone", "Everyone in the same network" or "Only people in this home".
With the second option, all users on the same WLAN can use the speakers. If you prefer this option, you can also restrict access with a password for a greater degree of security. The third option would require the addition of these users in the Home settings beforehand.
HomePod: Music controls on the iPhone and iPad
Playback controls for the HomePod can be found in the Control Center on iPhone or iPad as well. In order to gain access to this, tap the small icon in the top right corner of the music tile. A song that is currently being played can be streamed to your speakers or TV via AirPlay. If you have multiple HomePods in your home, you can also stream playback to multiple speakers simultaneously. That way, you have synchronised playback of music or podcasts throughout your home if you want.
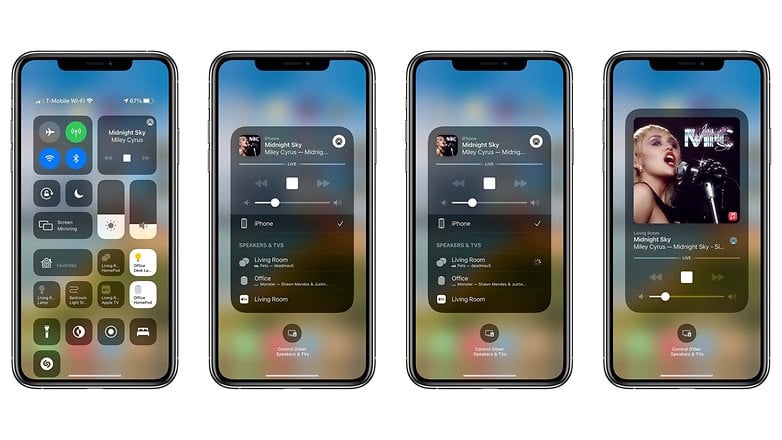
Alternatively, you can transfer the playback that is currently in progress, and this includes phone calls, for example, from the iPhone to the HomePod. In order to do this, you simply bring the smartphone close to the Siri-enabled speaker, and a notification will appear for you to confirm this handover.
Intercom: Intercom with the HomePod
With iOS 14.2, Apple also introduced the Intercom feature. This is a virtual intercom that can be used in conjunction with HomePods as well as Apple's other portable devices like iPhones, iPads, Apple Watch, and more. We've summarised how this works in our separate article about Intercom.
HomePod as a smart home hub
The HomePod - as well as an Apple TV or, if desired, an iPad - can function as a smart home hub. This is because Siri offers numerous features that allow you to check the temperature of your rooms, turn lights on and off, or even monitor the status of your smart door lock.
You can also conveniently control other HomeKit devices in your home using simple voice commands. Once it has been set up, you also have the advantage of using it whenever you are on the move via Siri on your iPhone. Hence, the question of whether you have actually locked the front door or not will no longer arise in the future.
What are some of your tips for smart homes within the Apple ecosystem? Have you discovered a hidden feature that can squeeze out a little more out juice from Apple's smart speakers? Let us know in the comments.


i am waiting for this and thankful to you for the best explanation.