Three tips for taking great photographs with bokeh mode


A sharp object with a soft background: even if you can still argue about the quality of their execution, smartphones are always becoming better and better at mimicking the image effects of digital SLR cameras with their technical tricks. We’ll provide you with three tips on how to take full advantage of your smartphone’s bokeh effects as well as portrait modes.
We also looked elsewhere to find out what bokeh actually is and how bokeh effects work with smartphones. Here’s just a quick recap: all digital bokeh effects are always based on your smartphone’s ability to distinguish between the foreground and background. This makes it possible to blur the background while the subject remains sharp in the foreground. And voila, the photo appears like it was taken from an SLR camera... maybe.
Tip 1: The right distance between subject and background
Of course, the first thing you need to do is activate the background blur or bokeh mode. This can be found either directly on the viewfinder screen of your camera app or in the menu with the various recording programs. If you can’t find a bokeh function, it might be hiding in portrait mode. In order for the distinction between the background and subject to made correctly, you can very simply hold your smartphone behind your hand. This makes it easier for it to work by increasing the distance between the subject and background. Everything above two meters is ideal.
Furthermore, a distance from the photographer to subject of between 50 centimeters to two meters is ideal for portraits. This distance may be quite a bit larger for smartphones like the Galaxy Note 8 or iPhone 8 Plus, which have an additional telecamera for the portrait mode.
2. Pitfalls: Eyeglass lenses, window panes, etc.
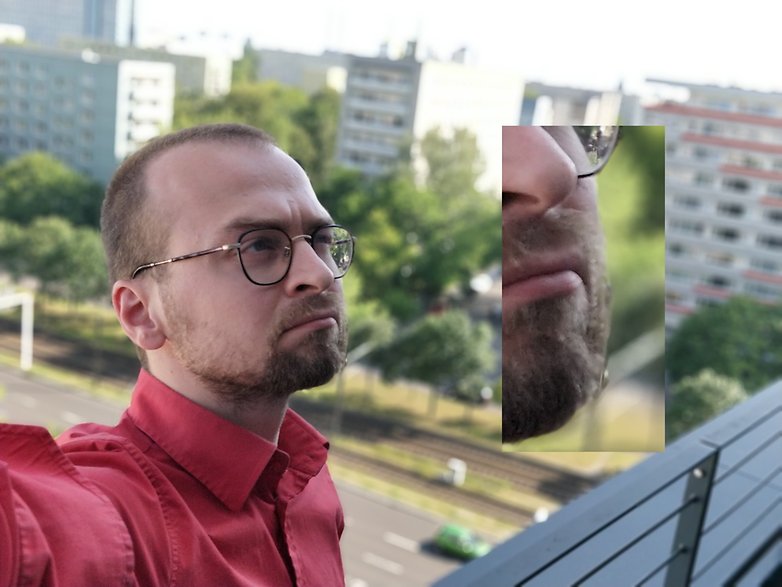
Even though digital bokeh effects are getting closer and closer to their optical precursor, there are still typical pitfalls. Transparent objects pose the greatest issue. Whether it's eyeglasses or cocktail glasses, smartphones usually group them with the foreground. Unfortunately, the blur is not applied to the background content on the other side of the glass, which should actually be blurry.
It is best to avoid having transparent objects in the foreground next to your subject. Make sure, for example, that the glasses of your model are completely in front of his or her face and that they do not protrude into the background, as they are in the following example with my colleague Eric.
Another big challenge for many smartphones’ selective blur are lines leading from the foreground into the background. With a ‘true’ optical blur they would simply appear blurred with increasing distance. Most camera apps, however, only distinguish very few depth levels in the picture. This often leads to the fact that such lines are then drawn out of focus abruptly at a certain point. Even though lines that lead from the foreground to the background are an interesting creative possibility, I would at least advise you to be careful.
Last but not least, I advise you to test the performance of your bokeh mode and explore its limits. Some smartphones have issues with fine details against colorful backgrounds, for example with hair that sticks out from the head. If you are aware of this, you can take it into account while photographing and improve the image quality.
3. The correct background
Hopefully after clearing some of the early stumbling blocks your smartphone is able to deliver a technically clean bokeh photo. We would now like to devote this section to finding the correct background because using bokeh mode isn't worth it if the subject of the photo is just placed in front of a gray background - which looks the same if the subject is sharp or blurred.

Instead, backgrounds with spots of light are particularly suitable. A string of lights, for example, or the illuminated windows of distant buildings are transformed by the blur into beautiful, soft spots of light. Another example is the sun, which shines through a tree and provides many small highlights. If you make a conscious effort, you will find many opportunities for a great bokeh.
Bonus tip 1: Light and shadows
Finally, I would like to present two small tips for successful portraits. When doing portraits, always note the light that is illuminating your model and look for sources of soft light. Soft light creates soft shadows and places the subject — literally — in more favorable light.
Large-scale light sources come into question here, such as a window with indirect light or a white wall that reflects sunlight. Photographs use soft boxes, among other things, to turn the point-formed flash into a light source that covers a large area.
Now position your subject so that the light comes from the side at about a 45 degree angle. Through the resulting (soft!) shadow your model will look more vivid in the photo than if the light entered from directly in front of them. For a more dramatic look you can also let the enter from the side. Experiment a little with this and compare the photos with one another.
Bonus tip 2: Framing
If you shoot a portrait, please do not position the person directly in the center of the picture, but instead always a tick to the side. If the picture is meant to look a bit more dramatic, we recommend aligning the subject with the rule of thirds. To do so, the photo is divided by two vertical and two horizontal lines into nine equal rectangles. The most important parts of the image should then be aligned with these lines.

A more harmonious image impression provides an alignment based on the golden ratio. The lines are shifted a bit further towards the middle of the picture.
And your thoughts?
Of course, a full-fledged camera offers more favorable conditions, but unfortunately you can’t always have your camera with you. I do think, however, that smartphones are always providing better tools for beautiful pictures. That’s why I’m interested in what tricks you have for shooting great portraits with your smartphone camera. I'm looking forward to your comments!
 2022 Product Image")

 Product Image")


 Product Image")