How to take better photos with your Android phone


To be a good photographer, it takes more than just a good camera. That being said, the technology is also important, and this also applies to smartphone photography. With the help of a few tweaks, a few apps and without additional knowledge, here's how you can get more out of your smartphone's camera. We've just added a couple of new tips for taking better sunset and party photos, plus an expert guide to bokeh effects.
Jump to section
- Preparation
- Photographic technology
- Subject selection and design
- Master the bokeh mode
- Use AI features
- The right focal length
Tips and tricks for smartphone photos: preparing your smartphone
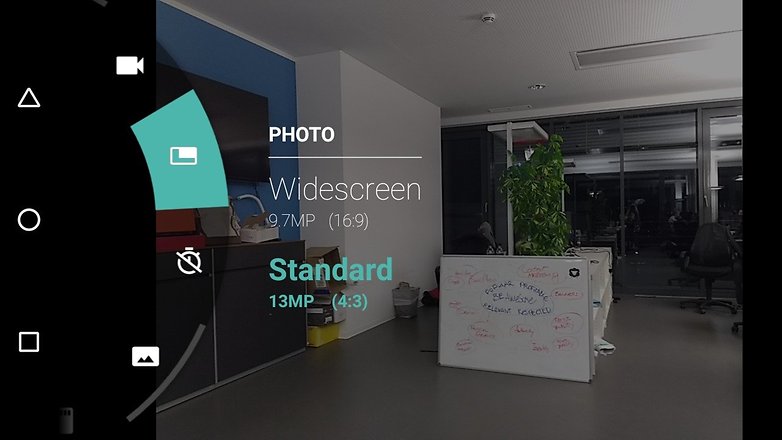
Smartphone photo tip: best resolution and picture quality
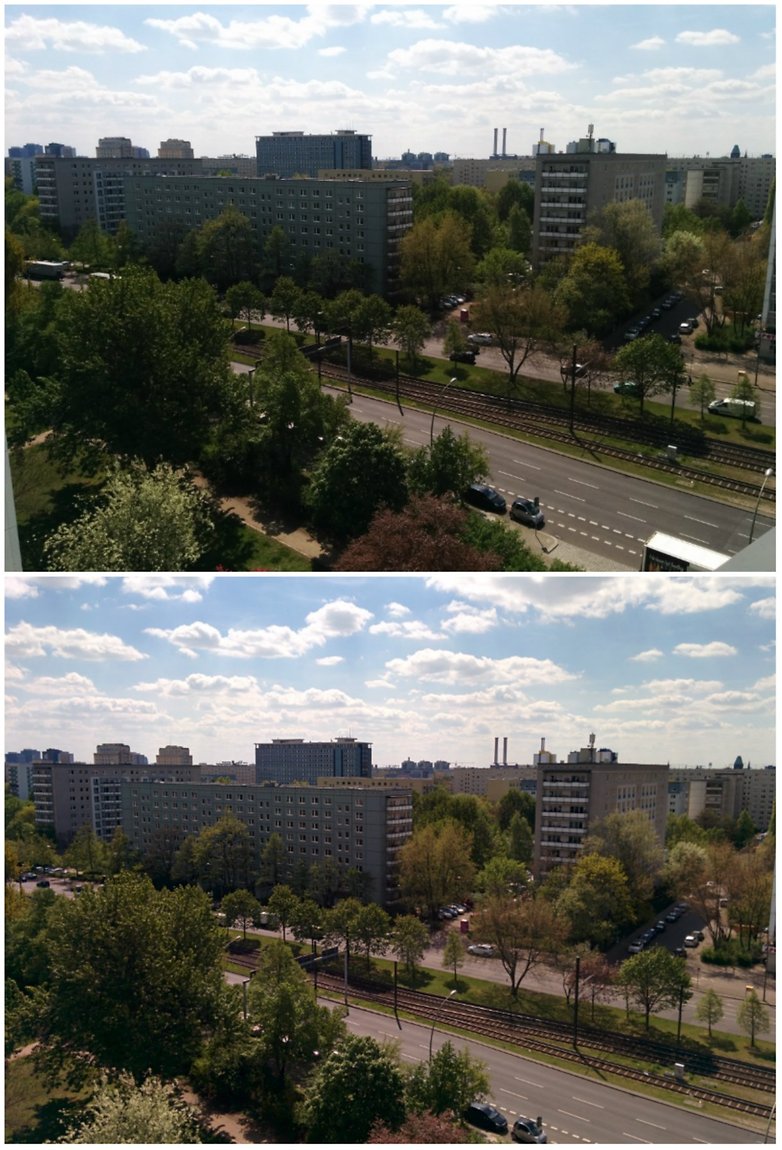
Before you get started with your smartphone camera, take a look at the settings. Frequently, the factory settings are not optimal. Sometimes a lower resolution is set. Often, this provides for a better digital zoom – but you should also follow our advice below. It is also advisable to adjust the aspect ratio so that you get the largest possible picture. The screenshot below shows the 16:9 format, because in the 4:3 format, pages are truncated. With other smartphones, it can be the exact opposite: the 4:3 format creates the largest photos, but the 16:9 images cut off part of the picture. Afterwards, you can select the best image detail.

Since high-definition pictures consume more memory space than those with low resolution, you should always have a microSD card – of course, this is only if your smartphone has the corresponding card slot. If this is not the case, save your old photos and empty the memory before taking more pictures.
Smartphone photo tip: clean the lens
Make sure the camera lens is free of dirt and fingerprints. The smartphone probably spends most of its time in your jacket pocket or purse, where dust can get on the lens. It’s best to wipe a cloth over the lens before taking a photo. Use a commercially available microfiber cloth or a cleaning cloth from the optician to clean the lens without scratching it. Facial tissues are also good if necessary, but they sometimes leave behind fine and annoying dust.
Tips and tricks for smartphone photos: technology and focus
Smartphone photo tip: finding the right exposure settings
In photography, three values are relevant to the photo: exposure time, aperture, and ISO values. Together, they determine how brightly the photo is exposed, how sharply the background is focused, and whether an object in motion is blurred in the image.
Aperture: For smartphone photos, you usually cannot adjust the aperture, because it is fixed. Therefore, it is important for smartphone photographers to find the right settings for the ISO value and exposure time. In automatic mode, the camera determines these independently, but the manual mode often provides better and more precise results.
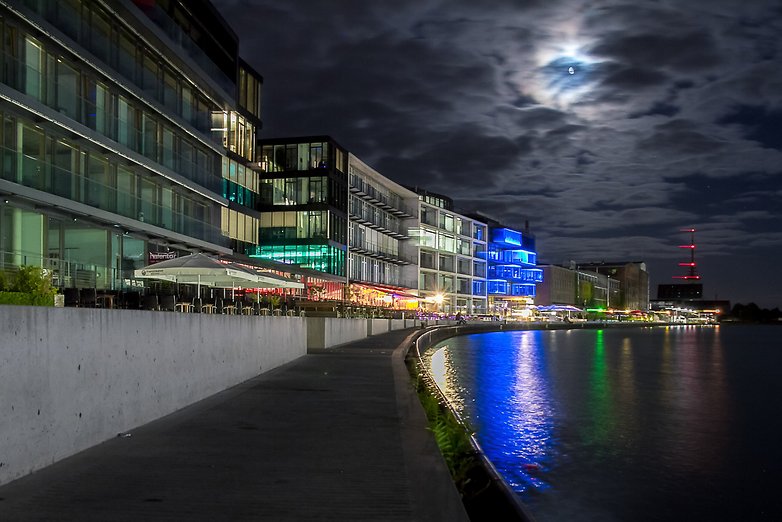
Exposure time: Long exposure times are an option for improving the illumination of your photo, especially in poor lighting conditions. However, this causes moving objects to create streaks. This effect can be used artfully for rivers or in night views of a city. Short exposure times, on the other hand, actually freeze a moment in time.
ISO values: The second value you should understand is the ISO value. This indicates the light sensitivity of the sensor. The higher the value, the more sensitive. With a higher ISO value, you can, for example, shorten the exposure time and thus provide sharper pictures. In dark environments, you often need a high ISO value and a long exposure time.
So why not always shoot with a high ISO value? The reason is simple: a high ISO value also creates more noise in the image. Each smartphone behaves a bit differently: some smartphones have camera noise problems at ISO 400 or 800, while others have noise problems even sooner. Therefore, you should learn how your smartphone camera handles this, and find out which ISO value leads to exact, acceptable results. For most situations, values up to a maximum of 200 are ideal.
Smartphone photo tip: set the focus manually
For a successful image, a lot depends on the right focus. The autofocus is usually helpful, but it is not flawless. After all, it often does not know what we really want to have in focus. A touch of the finger is enough to avoid this problem, because the touch focus is the solution. Touch the screen where you want the camera to focus. In the manual mode of the camera app, you can even focus the camera completely manually.
Smartphone photo tip: take multiple shots, sort them out later
Instead of relying on the perfect snapshot, it’s better to take multiple snaps of your subject. If the only photo of your romantic kiss in front of the Eiffel Tower in Paris is out of focus, you will probably regret it later. Just snap each subject several times and pay attention to the autofocus. And do this enough times until you think: that’s definitely a good picture. Nowadays, top-of-the-line smartphones offer a serial image function, which allows the camera to take several photos in a series with just one press of the button.
Smartphone photo tip: two-handed use
Fast snapshots often come to life in the midst of the deficiencies and dynamics of the moment, so they may be a bit shaky. But if it is to be completely clear, casual one-handed photography is simply not enough. Keep your smartphone steady and stable with both hands. A tripod with a smartphone holder is ideal for the perfect stand, but it is also often enough to support the smartphone on a railing and to stabilize it that way.
If this is not possible, then you should try to support your arms, or completely extend them. The less you move the smartphone, the sharper the captured photo will be.
Tips and tricks for smartphone photos: subject and perspective
Smartphone photo tip: rule of thirds
The rule of thirds is a simplified implementation of the golden ratio. The image is subdivided by means of two horizontal and two vertical guide lines, so that these create nine uniform boxes. For many smartphones, you don’t have to imagine the grid, because you usually have a function in place that serves as an aid. The subject should then be placed on one of the four intersection points of the grid, or also along a line, so that it is properly set in the scene. In landscape shots, it is useful to align the horizon on one of the two lines.
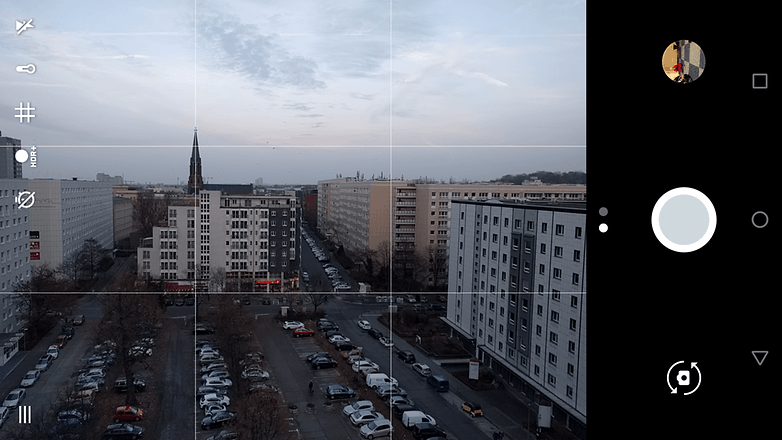
With the rule of thirds, a great photo composition is child’s play. There are additional settings for the help lines. Some apps can display the help lines also in the golden ratio, which can result in minor differences in the image design.
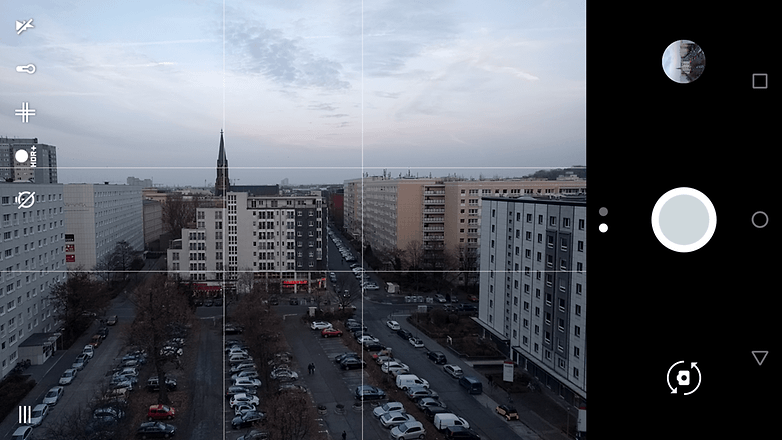
Smartphone photo tip: straight horizon
This tip is linked to the last one, and here you can also use the embedded grid in the viewfinder. Crooked lines bring unrest into a photo, unless it is intended. The horizon is the dominant line when looking into the distance, so ensure that the horizon is not crooked.
Smartphone photo tip: rule of space
As already mentioned, some subjects in the photo also need space “to breathe or to look.” Like the golden ratio, another element can create more harmony in a photo. Using the rule of space correctly, it creates a sense of movement, activity, or completion in the composition. With a portrait, the gaze of the subject can wander into the distance, and it is often ideal to leave space in the direction of the eyes, and to not cut off immediately at the face. For example, the gaze can also express the fact that the person portrayed is just concentrating – which often brings more life into the photo.
If you photograph a moving car, you should also leave room in the place where the car is driving to, instead of just showing the asphalt the car is on. This rule, like the rule of thirds, can and should be broken when a photo demands it and promises to become something special.

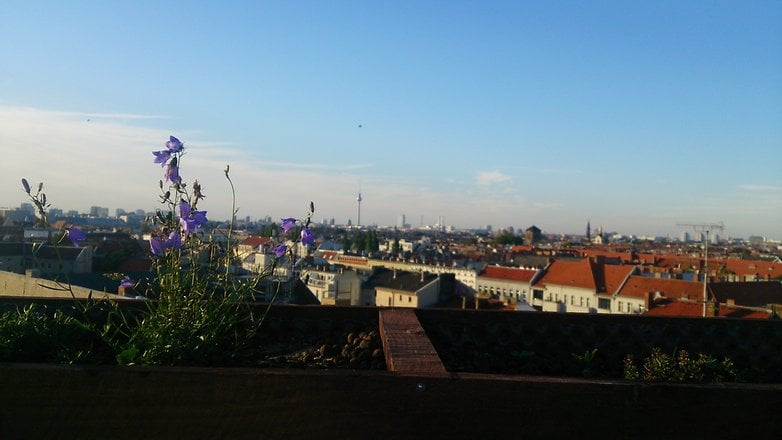
Smartphone photo tip: ensure elements in the foreground
Photos depict the three-dimensional space around us. If your subject is quite far away, however, it can be useful to enhance this with several image layers. A person, a tree or another object in the foreground breathes life into an otherwise stark panorama, because its presence lends the overall picture more depth.
Smartphone photo tip: photograph from above
If you want to take selfies or portrait photos of other people, you should keep the smartphone slightly higher when you take the pictures, so that the subject looks a bit upwards when you take the photo. This avoids the annoying double-chin effect and unwanted contours. Of course, there are other positions where your best side comes to the fore. If you look up, you stretch your neck and face and everything comes out a bit smoother and firmer without image processing and beauty mode. But don’t go overboard with the photographing from above, otherwise the person looks like a dwarf.

Smartphone photo tip: wait for the right time of day
Snapshots often don’t allow for the luxury of patient image composition. However, if you are planning a photo, you should consider when you take it because morning and evening hours often offer much more interesting light conditions than noon-time.
Smartphone photo tip: play with the perspective
A photo does not always have to be straight on; we already have that perspective all day long. Try a different angle, put yourself on a hill and photograph downward, or go down on your knees for a shot. This often creates more interesting pictures – except for the hated double-chin. So be careful with shots from below.
Smartphone photo tip: panorama
If you don’t want to photograph human beings, but nature and landscapes instead, the panorama mode is offered. Above all, very large subjects, such as a mountain chain or a sunset at sea, sometimes need more space than is available on a single photo. Pretty much every current smartphone has a corresponding mode that takes care of snapping and collecting multiple images and cleanly joining them together for you. If your smartphone is a bit older, an application from Google Play with the proper function can also be helpful. Panorama pictures are also suitable for a cover image on Facebook, even if the whole picture cannot fit in the frame; the most attractive part of your profile can be emphasized even more.
Smartphone photo tip: observe the lighting
Light can be your friend and your enemy, depending on your environment and what you want to capture. Frontal exposure to the sun is often a real problem, unless you intentionally overexpose the image and play with the contrast in post-processing. If possible, stand with your back to the light and avoid strong shadows from the front. If the frontal light source is sometimes unavoidable, add the flash, which sometimes helps.
Smartphone photo tip: use the flash only in an emergency
If a strong exposure is not absolutely essential for the image, one should refrain from using the flash, because it seldom produces really beautiful images. Not only does the quality of the colors suffer, the uniform illumination often completely destroys the image. The foreground shines bright white, while the background completely disappears. In the end, a photo with natural light and more picture noise is often more pleasant and handsome than one hit by lightning.

Smartphone photo tip: LED flash
The LED flash of the smartphone camera is to provide your snapshots with the appropriate exposure if the appropriate light is missing. But the result with smartphones is usually very disappointing and the subject seems unnaturally overexposed. The background also suffers from the bright light of the flash, which brings the subject to the foreground, but casts shadows on the remaining details. A photo flash often leads to hard shadows, which robs the image of its naturalness. As a countermeasure, you can use a semi-translucent white tape that sticks over the flash of your smartphone. That gives you a homemade diffuser that slightly reduces the hardness of the lightning and provides for smooth light and shadow transitions. This makes the photo more natural and beautiful. Especially at parties with a little subdued lighting, the homemade diffuser can work wonders.
Smartphone photo tip: zoom in with your feet
The digital zoom on the smartphone may save you a few steps, but it ruins the picture. This is still a big deficit of smartphone cameras compared against counterparts with optical zoom, as well as compact and SLR cameras. Since the zoom lens is missing, the image section is just digitally enlarged, which drastically reduces the detail resolution. So do yourself a favor and get a few steps closer.

Smartphone photo tip: love shadows as much as the sun
The HDR mode is increasingly used in smartphones to compensate for strong light discrepancies in the picture. First, it has its limits, and second, it often doesn’t need to be used if you simply put yourself in the shade and photograph outside of it. Direct light can affect the image greatly, so bright sunshine does not always ensure radiant images.
Smartphone photo tip: effective post-processing
Now we leave the field of photography. Once the pictures are taken, there’s a next step: sharing them. Before you do this, however, you can still improve the photos – be it to correct the colors, to choose the right cut, or to add more drama with filters. For this, you should install the appropriate image editing app:
Smartphone photo tip: choose the right app for you
The default camera app from your smartphone is probably decent but it might not have all the features you like best for your shooting style. It's worth taking a look at the options out there, both in paid apps for all the premium extras, and even really good free ones like Google's camera app or Open Camera. Check our out top recommendations in our best list:
Smartphone photo tip: take sunset photos
Sunsets look great in person, but often when you try to capture the moment with a smartphone, the results are underwhelming. Smartphones have small image sensors with a low dynamic range, which means they can't capture both the light and dark areas of the image well at the same time. That leaves photos both underexposed and overexposed. This problem can be defeated if your camera has an HDR mode. HDR stands for High Dynamic Range, and it takes several shots with different exposures at once, combining them all together for an extended dynamic range. This results in the desired effect of accurate lighting, color and more details. The sunset will look as it's supposed to, rather than simultaneously under and overexposed.

Smartphone photo tip: take great party photos
At parties, the environment is often quite dark and the subjects of your photo will likely be moving around a lot. To avoid poor results, there are a few things you can do. In bars and dimly lit rooms, you'll be well-served by using the flash. Try to take photos where the background is lit so the photos don't turn out boring and dark. Since people will be having fun and moving around, the best thing to do is take multiple shots so at least one won't be ruined by blur.

Get to grips with your bokeh mode with these tips
Bokeh is everywhere these days. Almost every top smartphone has an integrated bokeh mode in its camera app at the moment and Apple is going big on the feature with its 2018 iPhones. Bokeh is an effect that puts your primary object in sharp focus whilst blurring the background to make it much softer than your subject. It essentially mimics the image effects of an SLR camera, and when you get it right, the results can be impressive. Here's how to do it right.
- Find the bokeh mode in your camera app and activate it. On some devices, it's a small circular icon.
- Get the distance right between your subject and object by moving the camera.
- Set your preferred level of aperture (if available). This will determine how blurred your background is compared to the subject.
- Be careful of glasses or windows, which can upset the effect.
- Try to shoot in front of a textual background, a plain white wall will look the same blurred or sharp.
- Shoot! On the new iPhones, you can even adjust the depth of field after you have taken a shot - pretty cool!

AI functions and their pitfalls
More and more smartphones are coming along with so-called AI functions that are intended to help photographers. With processes from the field of machine learning, smartphones recognize what is in front of the lens and automatically adjust numerous parameters. In contrast to the normal automatic mode, these include not only white balance, exposure time, ISO and other basic options, but often also effects such as a bokeh calculated into the image, simulated studio light, the combination of several shots into one and similar things.
Especially beginners in photography will benefit from this, but also those who don't want to try out and think a lot, but just want to get on with it quickly. Often the AI support gives a smartphone photo the finishing touches. In difficult conditions, such as low light, the AI can provide important support.

But there are also situations and motives in which these AI helpers mean it a little too well. Again and again pictures are created in which especially the colors seem to be extremely turned up. Also, beauty and portrait effects can really distort a photo. It's not always best to keep all settings automatic, especially as there is no such thing as the "perfect" photo: Every photographer finds a different look more appealing and not every picture should achieve the same effect. The automatic system therefore also restricts the creative possibilities.

You should be aware that such AI functions can sometimes be helpful, but they can often overshoot the mark. Reason enough to use them in doses. There's nothing wrong with keeping these AI features active, as they are especially useful for snapshots where time is short. If, on the other hand, you have enough time to take a photo, it's worth switching off these automatic functions, because manual settings are usually at least as good, but in any case more natural results can be achieved.
Some smartphones, such as Honor 10, save two images at once, one with and one without AI improvements, leaving you the choice afterwards. This is especially practical. By the way: AI in smartphones doesn't necessarily have to be expensive, especially since a mobile phone contract with a mobile phone can also be a cheap option.
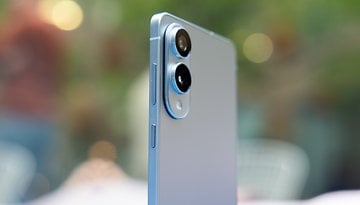
Selecting the correct focal length
Many modern smartphones have two, three, sometimes even four different cameras on the back. As a rule, they have different focal lengths, such as an ultra-wide angle or a telephoto lens. So you can get really creative!
The different focal lengths bring smartphones closer to real cameras in their possibilities, because they save you the digital zoom. Especially wide-angle lenses are useful for capturing a lot of landscape. The slight distortions are minimized if you keep the horizon in the center of the image. With apps like SKWRT, you can also easily straighten the perspective.
INSTALL (accky.kreved.skrwt.skrwt)
By the way, an ultra-wide angle lens can not only be used for landscape shots and the far range. With the Mate 20 Pro from Huawei, for example, this lens can also be used for macro photography from very short distances. Last but not least, you can also take indoor photos in rooms with which you can get much more on there picture.

With a telephoto lens with zoom - smartphones can currently zoom up to about five times, but manufacturers usually leave it at twice the focal length - you can bring things closer. That's totally handy when you can't get close. But a telephoto is also good for portrait photos, especially as it enhances the bokeh effect, i.e. the depth of field. But then you should plan enough distance to the person.

But be careful: Usually not only the lenses are different, but also the sensors. It can therefore happen that differences in exposure or white balance occur when using the wide-angle or telephoto lens, for example. Therefore, after switching to another camera, it is best to check directly whether everything looks the way you want it to. Some smartphones, such as the LG V40 ThinQ, even offer you the option of taking photos with all cameras at the same time with just one click. Then you can decide later which one you like best.
Do you have any good photo taking tips you could share with us? Did our tips help you? Let us know in the comments below?


Nice blog, It worked on my Samsung J7
Not all Smartphones are the same.
For example, I have a Motorola G7 (sorry that North America isn't getting the PLUS variant) has a 12 MP + 5 MP dual camera system back camera / 8 MP front camera and both take decent pictures (thanks to the latest software + the Qualcomm 632).
But this Smartphone will take better pictures when you download and install the Google Camera App (could it be possible the same could happen with your Smartphone?)
https://play.google.com/store/apps/details?id=com.google.android.GoogleCamera
I totally agree with your viewpoint.I have two co related queries in this regard that Why does it takes a lot of time for gopro videos to get uploaded and other one I am unable to connect the Arlo ultra with my Mac book Air.I have tried out the following the arlo home security review.Suggest us what to do next?
for smart phone is best
amazing
interesting
Photo performance for smartphones rose to a level that was not imaginable until a few years ago. And that's very good.
Now you can take high-quality photos and you can value the artistic talents of each user. What is wonderful.
Thanks for the article. It must have taken a lot of time and effort to write this detailed article with such level of expertise. Thanks again.
Good tips. Also, typically the built in camera apps aren't that good. The google open source app is a pretty good one as well as the one I use, Camera FV-5, which can mimic a lot of traditional camera settings. ISO, shutter, f/stop, white balance, EV etc. Another tip...some people just cannot hold a camera still for anything. If able, the side of a building, pole or object can help you steady the phone. Most smartphones have an OPTICAL image stabilizer, which helps cut down blurry photos due to shake. Don't go for the electronic IS (E-IS) ones, which is a less expensive faux stabilizer. If you have a hard time, the OIS is the best you can find.
You can also pick up those inexpensive tiny tripods to snap onto your smartphone, to steady the photo.
I've been shooting photos, since the 70's, switched to the digital d-SLR's in the early 2000. Best thing you can
do, which is MUCH more fun, and a heck of a lot LESS EXPENSIVE than it was when I was shooting film, is PLAY AROUND with the settings. Play with the shutter speed, ISO, f/stops and see what happens. Nice thing about today versus film. The digital photos exif data will show you how you shot it. In my film days, I kept a small notebook, writing down the settings I used, so I would know what worked.
Thanks for adding your thoughts, Rusty!
thanks for sharing!
Thanks for the info
Not a professional photographer I am but do have interest in photography. Was thinking to start with my own smartphone initially for this. Thank you for letting us know about the tricks of taking a perfect shot using smartphone here.
Good tips. I'd throw in a couple of considerations:
a) check to see if the Android 5+ device supports "Camera2 api" features, or not - that adds RAW/DNG and a lot of manual settings capability, depending if and how much of it is available. (An article here on Camera2 and phones/apps that optimize would be a good thing.)
b) check if the camera app supports touch light metering (Open Camera doesn't call it that, but does it) which lets the user set exposure by touching the lit or unlit area of the composition to meter to. You can watch the screen adjust by simply touching or long-pressing a lit lamp or shadowy area.
c) Update: I recently noticed serious intrusive denoise smearing of JPEG details on my ZTE at ISO 100 (when there's no noise, a famous problem with many phones) and it caused me to look for apps that will toggle wavelet denoise off/on. Bacon Camera and Snap Camera HD have that feature. Those apps and Camera FV-5 also have a sharpening slider that can help. (Not an issue for RAW/DNG but JPEGs out of camera are what many users shoot. Disappointed that the free and generally sophisticated Open Camera doesn't do these things.)
d) there's a steep learning curve to camera apps, especially the more sophisticated "manual" third-party apps, and users are much better off getting quick-response familiar with one good app than installing half a dozen with maybe one or two "features" that look good. Using an unfamiliar app is a recipe for failure.
Nice synopsis. Well done.
I agree with most of the tips provided here. I hate using Flash even in low lights conditions.
I actually do some of these tips already. Only those additional settings and apps are not available to me. No flash, Rule of the third, landscape, etc. but thanks anyway, it confirms my doubts.
I just got hold of a still brand new k zoom and I've tested all the new phones out and I like the k zoom the best even more than the new galaxy note 7. They don't make them any more but I want to buy a second k zoom for a back up. I like the optical zoom which is just crazy for a smart phone. I think the phone is too far ahead of it's time for people to accept it. Maybe I five years or so.
You need a tripod if you have optical zoom. make your own attachment to fix the Samsung deficiency.. Remember set the phone to take photos 2 seconds after touch camera. Especially using HDR indoors.
What a waste. Clean your lens? Use Tiny Planets? Use post-processing? These are ridiculously stupid. Why not include Point phone At Subject... or Identify Object To Photograph? There are, at most, maybe one or two actual "tips" here of any practical use or value. Unless you want to deform or unnaturally manipulate your photo into an art object or something else other than a photo. Then I guess some of these lame apps just might interest you.