- Forum posts: 18
Aug 24, 2014, 2:51:12 PM via Website
Aug 24, 2014 2:51:12 PM via Website
I want to share some codes of a small effect that I implemented in my Android app called Arithmetic Puzzles. This is also a chance for me to listen to other people and make improvements. At the end of this post there is a link to the app so that you can see the code in action.
It is a text shining effect which reacts on device movements. It creates a feeling of glass surface of the text which shines and reflects light. Only outline of the text is shining.
Please note that the text in my case was very short - a number with 2 digits - which looks cool. If you will try a longer text then let me know how it looks 
I grabbed some parts of my code from its context to put here so if there is something missing or irrelevant then just let me know.
So, here we go! The text shine is done extending a simple View:
public class EquationView extends View {

...
// the text to be drawn
private String mText;
private Paint mTextPaint = new Paint(Paint.ANTI_ALIAS_FLAG);
private Paint mTextShinePaint = new Paint(Paint.ANTI_ALIAS_FLAG);
private int mShineColor;
private int mShineNoColor;
...

// constructors
public EquationView(Context context) {
    super(context);
    init(context);
}

public EquationView(Context context, AttributeSet attrs) {
    super(context, attrs);
    init(context);
}

public void initialize(Context context) {
    // paints
    setupPaint(mTextPaint, R.color.text_color, context); // text color (yellow for me)
    setupPaint(mTextShinePaint, R.color.text_shine, context); // shine color (white for me)
    mTextShinePaint.setDither(true);
    mTextShinePaint.setStyle(Paint.Style.STROKE);
    mTextShinePaint.setStrokeJoin(Paint.Join.ROUND);
    mTextShinePaint.setStrokeMiter(10);

    // colors
    mTextShadowColor = context.getResources().getColor(R.color.text_shadow); (#AA454210 for me)
    mShineColor = context.getResources().getColor(R.color.text_shine); (white for me)
    mShineNoColor = context.getResources().getColor(android.R.color.transparent);
}

private void setupPaint(Paint paint, int colorId, Context context) {
    paint.setColor(context.getResources().getColor(colorId));
    paint.setTextAlign(Paint.Align.CENTER);
}
The initialization function is setting up the paint objects. Since I am going to use LinearGradient as a shader in my paint, I am setting the dither to true. I have already wrote about it in my previous guide. I am also setting the shine paint style to STROKE so that only the outline of the text is "shining".
The stroke parameters like join and miter are mostly set to make it look prettier.
I also set the text align to CENTER. This has effect during drawing of the text - when I tell the paint to draw a text at some (x, y) point, then x is considered as the center point of the whole text, thus text is centered horizontally on this origin.
Next, let's have a look at the onDraw() function:
...
private static final float TEXT_HEIGHT = 0.8f;
private static final float SHINE_THICKNESS = 0.015f;
private final float mShadowBlurRadius = 5.0f * getResources().getDisplayMetrics().density; // 5dp

private LinearGradient mShineGradient;
private int mTextShadowColor;
private float mShadowShiftX = 0.0f;
private float mShadowShiftY = 0.0f;
private Rect mBounds = new Rect();
private Rect mTextBounds = new Rect();
...

@Override
protected void onDraw(Canvas canvas) {
    // step 1. collect information needed for drawing
    canvas.getClipBounds(mBounds);
    float centerX = mBounds.centerX();
    float h = mBounds.height();
    float textSize = h * TEXT_HEIGHT;
    float textCenterY = mBounds.top + h * 0.5f;

    // step 2. draw the shadows
    mTextPaint.setShadowLayer(mShadowBlurRadius, mShadowShiftX, mShadowShiftY, mTextShadowColor);
    drawText(mText, centerX, textCenterY, textSize, canvas, mTextPaint);

    // step 3. draw the shine
    if (mShineGradient != null) {
        mTextShinePaint.setShader(mShineGradient);
        mTextShinePaint.setStrokeWidth(TextSize * SHINE_THICKNESS);
        drawText(mText, centerX, textCenterY, textSize, canvas, mTextShinePaint);
    }

    // step 4. draw the text
    mTextPaint.clearShadowLayer();
    drawText(mText, centerX, textCenterY, textSize, canvas, mTextPaint);
}

private void drawText(String text, float centerX, float centerY,
                      float size, Canvas canvas, Paint paint) {
    paint.setTextSize(size);
    paint.getTextBounds(text, 0, text.length(), mTextBounds);
    canvas.drawText(text, centerX, centerY + mTextBounds.height() / 2.0f - mTextBounds.bottom, paint);
}
In step 1 I collect information for drawing like clip bounds (see previous guide for clip bounds), sizes and positions.
In step 2 I draw the shadows. I also want the shadows to move when device moves (on gyroscope events). I actually draw the text with shadows - the text will be overdrawn in next steps so only shadows will be left from this step. The offsets of the shadows - mShadowShiftX and mShadowShiftY - are updated based on gyroscope data.
In step 3 I draw the shine. I set the LinearGradient mShineGradient as the shader of the paint and then set the stroke width to SHINE_THICKNESS. Then I draw text with that shader. For more information on shaders see my previous guide. The mShineGradient is updated when new gyroscope data is received. We will come to this gradient creation later.
In step 4 I disable the shadows and draw the text again. It will overwrite only the text, not the shadows and not the shine, so I have only the outline shining.
A common drawText() function is used to draw the text. It first sets the text size (font size), then calculates the text bounds using getTextBounds(). This is needed to center the text around the origin point also in vertical direction since Paint.Align.CENTER is aligning only in horizontal direction.
Now lets see how is the mShineGradient created. This is done every time we got a new data from gyroscope:
...
// all the magic numbers here and in below function are results of experiments
private static final float MAX_ANGLE = (float)(Math.PI / 2.0);
private final float mShadowMaxShift = 5.0f * getResources().getDisplayMetrics().density; // 5dp
...

public void gyroChanged(float xAngle, float yAngle) {
    // 1. shadows
    float loweredMax = MAX_ANGLE / 4;
    mShadowShiftX = (xAngle / loweredMax) * mShadowMaxShift;
    mShadowShiftY = (yAngle / loweredMax) * mShadowMaxShift;

    // put in [-mShadowMaxShift, mShadowMaxShift] range
    if (mShadowShiftX > mShadowMaxShift) mShadowShiftX = mShadowMaxShift;
    if (mShadowShiftX < -mShadowMaxShift) mShadowShiftX = -mShadowMaxShift;
    if (mShadowShiftY > mShadowMaxShift) mShadowShiftY = mShadowMaxShift;
    if (mShadowShiftY < -mShadowMaxShift) mShadowShiftY = -mShadowMaxShift;

    // 2. shine
    float angleX = xAngle / MAX_ANGLE;
    float angleY = yAngle / MAX_ANGLE;

    // put in [-1, 1] range
    if (angleX > 1.0f) angleX = 1.0f;
    if (angleX < -1.0f) angleX = -1.0f;
    if (angleY > 1.0f) angleY = 1.0f;
    if (angleY < -1.0f) angleY = -1.0f;

    createShineGradient(angleX, angleY);

    // redraw
    invalidate();
}
The numbers and formulas are quite experimental, so you can play around to find the best numbers for your case. The meaning and usage of gyroChanged() function is explained in my previous guide.
The basic idea behind is to get the shine position based on device's rotation in X and Y direction. I convert the rotation into a range from -1 to 1 using some max angle that I defined. If both X and Y angles are -1 then the shine line is in the lower left corner of the text, if both are 1 then in upper right corner, otherwise somewhere in between.
Here is the createShineGradient() function:
...
private static final float SHINE_WIDTH = 0.07f;
private static final float SHINE_BLUR_WIDTH = 0.05f;
...

private void createShineGradient(float relativeX, float relativeY) {
    if ((mBounds == null) || (mBounds.width() == 0) || (mBounds.height() == 0)) {
        mShineGradient = null;
        return;
    }

    // we want to scale the angles' range and take inner part of
    // length 1 this will speed up the shine without sudden stops
    final float SPEED_FACTOR = 4.0f;
    relativeX *= SPEED_FACTOR;
    relativeY *= SPEED_FACTOR;

    float boxSize = mBounds.height() * 1.2f; // make the text box a bit bigger
    float left = mBounds.centerX() - boxSize / 2.0f;
    float top = mBounds.top;

    // project the (relativeX, relativeY) point to the diagonal
    float relative = (relativeX + relativeY) / 2.0f;
    // shift by 0.5 to get a point from (0, 1) range
    relative += 0.5f;

    int[] colors = {mShineNoColor, mShineNoColor, mShineColor, mShineColor, mShineNoColor, mShineNoColor};
    float[] positions = {0.0f, clamp(relative - SHINE_WIDTH - SHINE_BLUR_WIDTH),
                         clamp(relative - SHINE_WIDTH), clamp(relative + SHINE_WIDTH),
                         clamp(relative + SHINE_WIDTH + SHINE_BLUR_WIDTH), 1.0f};

    mShineGradient = new LinearGradient(left, top + boxSize, left + boxSize, top,
                                        colors, positions, Shader.TileMode.CLAMP);
}

private float clamp(float value) {
    if (value < 0.0f) {
        return 0;
    }
    if (value > 1.0f) {
        return 1.0f;
    }
    return value;
}
Again, there are a lot of experimental stuff, you might want to play with it to come to a good solution. The LinearGradient shader is explained in my previous guide. However, here we use more colors so that we can have a white stripe in the middle with small color change gradients on borders. The picture below explains everything:
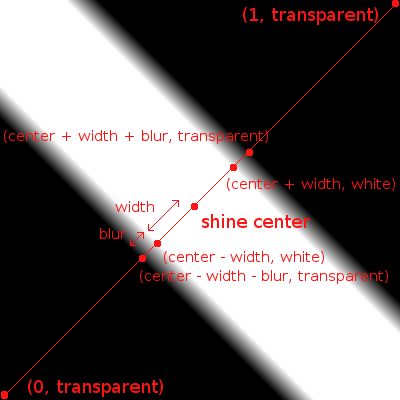
The idea is to project the relative angle of the device rotation in X and Y direction to a single point on the View's diagonal through which the shine will pass. This projection should result in continuous and more or less natural movement of the shine line during device rotation, the formula I used is a result of my tries and errors.
When a new gradient is created invalidate() is called and the view redraws itself.
Finally, to see this code in action, you can have a look at the app itself, its free:
Google Play:Arithmetic Puzzles
It would be nice to get some comments and suggestions, let me know your thoughts!