- Forum posts: 7
Jan 21, 2016, 7:59:04 AM via Website
Jan 21, 2016 7:59:04 AM via Website
As an Android lover, you must have a deep need of rooting your Android device at the very beginning of the journey. Rooting lives up to its reputation. After rooting, you can be the big master of your phone. You can get rid of those unwanted pre-installed apps in one click. Also, all of the forbidden features can be blocked. Thus, you can freely enjoy every corner of your Android device and exploit to its utmost use.
At the same time, you should pay attention to the disadvantages of rooting as it can void the warranty of manufacture. If you are OK with this problem, then go to the following tutorial of how to root Android 2.2 to 4.4 (4.4.2 & 4.4.4) free.
In most case, you will go to search the top root apps for help. Here will introduce the free iRoot to root any of your Android device. iRoot has the powerful ability to one click root your Android device, without any data lose or damage.
Note: Once you root your Android phone, you need to understand the advantages and disadvantages of rooting.
Pre-Check before rooting
Make sure your device’s battery life is beyond 85%.
Enable the USB Debugging mode on your device;
A: Android 2.0-2.3.x - Settings > Applications > Development > USB Debugging.
B: Android 3.0- 4.1.x - Settings > Developer Options > USB Debugging.
C: Android 4.2.x and higher - Settings >About Phone > Tap the Build number field 7 times to enable Developer Options
Back up your device before rooting. Rooting will not cause data lose. But you can backup in case of unpleasant things happening.
Then, go to the guide of rooting your device with iRoot.
First, go the website of iRoot to download the Android rooting software. It includes two versions. If you need to root Android without PC, try to download iRoot APK. Here we’ll take the iRoot for PC for you to perform.
Step 1: After downloading iRoot on your Windows PC. Install and open it.
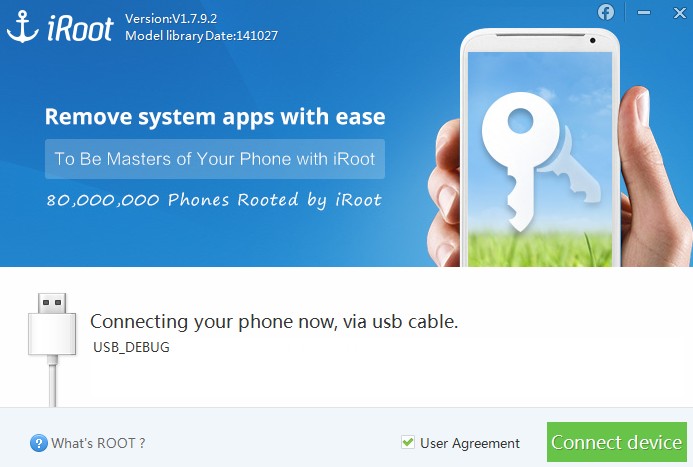
Step 2: Connect your device to the PC. Make sure you have installed the driver on PC.
Step 3: Click “Connect device” on iRoot interface. It will detect your device.
Step 4: Once it’s done. Click “Root” to start the process.
Step 5: Android device will restart after rooting successfully.
Done! You have rooted your Android device now.
